Social Media previews look pretty neat when sharing links to your blog on social media (e.g. Twitter). These can be configured in many ways, and are often defined manually (unique image per post). Some sites use a heading image for the blog post that appears at the top of the article and in social media.
Manually picked preview images
Here is an example of a shared post from my blog, where the social media preview image has been manually picked:
Eager to try async/await in Swift? Now you can! Here is how: https://t.co/PMk7E7iLhr#swift #async #await
— Eneko Alonso (@eneko) December 7, 2020
Templated or generated preview images
Other sites automatically generate an image programmatically (or with a template). Here are some examples of templated previews, or programmatically generated ones.
This approach popped up in a recent coaching session I was running. There's a few trade-offs, but I might be using this technique more in the future.
— Joe Masilotti (@joemasilotti) December 24, 2020
Have you tried something like this? Is there a less obvious downside that I'm missing?https://t.co/PZZC0iXI7L
Get started with Associated Types in Swifthttps://t.co/Gwe5cSyErr
— Antoine v.d. SwiftLee 🚀 (@twannl) December 26, 2020
🤓 Associated types explained
💪🏼 Real case code example shared
🚀 Reuse code among multiple types#swiftlang #iosdev
Making a media preview image for my blog from scratch
I wanted to generate the image myself, in Swift, and preferably with SwiftUI. I also wanted this to be done in the cloud, instead of my computer. If you’ve been following my posts, you might remember my goal is for me to write GitHub Issues on my Blog repo and have the workflow take it from there.
Working with SwiftUI previews
This repository is set up as a Swift package. While SwiftUI views can be written and distributed inside Swift packages, Xcode does not support yet generating live previews without an Xcode project 😭
So I made a bogus macOS application with my view on it, so I could code it and preview in real-time. The best thing about SwiftUI previews is being able to set up multiple previews, to try different values for blog post titles, tags, etc.

Swift code
Here is the code for my SwiftUI view, as of now (might probably change by the time I finish writing this article)
struct SocialPreview: View {
    let brandColor = Color(#colorLiteral(red: 0.1843137255, green: 0.5411764706, blue: 1, alpha: 1))
    let textColor = Color.white
    let dateTemplate = DateTemplate().month(.full).day().year()

    let title: String
    let tags: [String]
    let date: Date
    let issueNumber: Int

    var body: some View {
        ZStack{
            VStack {
                HStack() {
                    Spacer(minLength: 0)
                    Text(binary(title: title))
                        .font(.custom("Monaco", size: 16))
                        .multilineTextAlignment(.trailing)
                        .frame(maxWidth: 200)
                }
                Spacer(minLength: 0)
            }
            .padding()
            .opacity(0.1)

            VStack(alignment: .leading, spacing: 10) {
                Spacer(minLength: 0)
                VStack(alignment: .leading) {
                    Text("enekoalonso.com")
                        .font(.custom("SF Pro Display", size: 24))
                    Text(title)
                        .font(.custom("SF Pro Display", size: 64))
                        .fontWeight(.bold)
                }
                HStack {
                    ForEach(0..<tags.count) { index in
                        let tag = tags[index]
                        Text(tag)
                            .font(.custom("SF Pro Display", size: 24))
                            .fontWeight(.bold)
                            .padding(EdgeInsets(top: 5, leading: 10, bottom: 5, trailing: 10))
                            .overlay(
                                RoundedRectangle(cornerRadius: 10)
                                    .stroke(textColor, lineWidth: 2)
                            )
                    }
                }
                Spacer(minLength: 0)
                HStack(alignment: .firstTextBaseline) {
                    Text("An Over-Engineered Blog")
                        .fontWeight(.semibold)
                    Text("—")
                    Text("Issue #\(issueNumber)")
                    Spacer()
                    Text(dateTemplate.localizedString(from: date))
                        .font(.system(size: 18))
                }
                .font(.custom("SF Pro Display", size: 24))
            }
            .padding(80)
        }
        .frame(maxWidth: .infinity, maxHeight: .infinity)
        .foregroundColor(textColor)
        .background(brandColor)
    }

    func binary(title: String) -> String {
        let trimmed = String(title.prefix(60))
        let binary = Data(trimmed.utf8).map { byte in
            String(String(String(byte, radix: 2).reversed()).padding(toLength: 8, withPad: "0", startingAt: 0).reversed())
        }
        return binary.joined(separator: " ")
    }
}
I added a method to render the blog post title as binary code. I have many other ideas to decorate the background based on the blog post title and tags, but haven’t get to do it yet. Maybe later.
To rasterize the SwiftUI view into an image, I’m using the same technique I used with ConsoleUI. Basically, the process is to use an NSHostingView view, rasterize it’s contents to PNG, and save to disk.
struct SocialPreviewGenerator {
    static func main() throws {
        let arguments = ProcessInfo.processInfo.arguments
        guard arguments.count == 3 else {
            print("Missing arguments.")
            return
        }
        let title = arguments[1]
        let tags = ["docker", "linux", "swift"]
        let date = Date()
        let issueNumber = Int(arguments[2]) ?? 0

        print("Generating Social Preview for issue #")

        let view = SocialPreview(title: title, tags: tags, date: date, issueNumber: issueNumber)
        let wrapper = NSHostingView(rootView: view)
        wrapper.frame = CGRect(x: 0, y: 0, width: 1280, height: 640)

        let png = rasterize(view: wrapper, format: .png)
        try png?.write(to: URL(fileURLWithPath: "issue-\(issueNumber).png"))
    }

    static func rasterize(view: NSView, format: NSBitmapImageRep.FileType) -> Data? {
        guard let bitmapRepresentation = view.bitmapImageRepForCachingDisplay(in: view.bounds) else {
            return nil
        }
        bitmapRepresentation.size = view.bounds.size
        view.cacheDisplay(in: view.bounds, to: bitmapRepresentation)
        return bitmapRepresentation.representation(using: format, properties: [:])
    }
}

try SocialPreviewGenerator.main()
You can find the full source code on this repo, feel free to use it.
Setting up the workflow
Since SwiftUI only runs on Apple platforms, I decided to run this process in a GitHub Action workflow, using a macOS job.
Here is how it works:
- I’ve updated my existing issue workflow, adding a new
generateSocialPreviewjob - This job runs on macOS
- The job checks-out the repo, and runs the Swift command to generate the media preview image.
- Finally, the workflow uploads the generated image to Amazon S3.
This workflow will run before pushing the issue changes to AWS SQS.

Uploading images to Amazon S3
Uploading files to S3 is pretty easy, since we can use AWS CLI in Github Actions. First, we set the credentials, and then we are good to go. Here, I’m hardcoding the file name, but will later be dynamic based in the issue number:
- uses: aws-actions/configure-aws-credentials@v1
  with:
    aws-access-key-id: ${ { secrets.AWS_ACCESS_KEY_ID } }
    aws-secret-access-key: ${ { secrets.AWS_SECRET_ACCESS_KEY } }
    aws-region: us-east-2
- name: Copy to S3
  run: |
    aws s3 cp issue-25.png s3://eneko-blog-media/social-preview/issue-25.png --acl public-read
To get this working, the user role associated with the credentials must have permissions to put objects in S3, and to update their ACL, so they can be make public-read.
Here is how my policy looks like:
{
    "Version": "2012-10-17",
    "Statement": [
        {
            "Sid": "VisualEditor0",
            "Effect": "Allow",
            "Action": [
                "s3:PutObject",
                "s3:PutObjectAcl"
            ],
            "Resource": "arn:aws:s3:::eneko-blog-media/*"
        }
    ]
}
Running the workflow
After a couple of runs testing permissions, the workflow completed successfully.

Unexpected Issue: No Fonts!
Well, not that there are no fonts, but the fonts I’m using, “SF Pro Display” and “SF Mono” do not seem to be installed on macOS instances in Github Actions. 😭
Here is how it looks like “out-of-the-box”

Attempt 1: Adding custom fonts
I downloaded SF Pro Display and SF Mono fonts from Apple website, added them to this repo, and updated the workflow to copy them to ~/Library/Fonts.
No luck. While the workflow completed successfully, the rendered image looks as before, without custom San Francisco fonts.
Attempt 2: Using system fonts
Instead of trying to install a custom font (might try again later), for now I’m going to use the default system font.
And… there you go! Much better 👏👏

Final steps
Now that the workflow is working, there are a few remaining tasks:
- Configure preview generator to pass all issue arguments (title, tags, creation date and issue number). Since it is a command line tool, I could either pass this info via individual arguments, or passing JSON via stdin or disk.
- Update post template to use new generated image url for social media previews.
Let’s get to it.
Processing event issues (JSON)
Since I already have the Codable structures for the Lambda to load the event issue JSON, I decide to also use them for the social media preview generator. Here are the two structures I’ll be using:
public struct GitHubIssue: Codable {
    public let number: Int
    public let state: String
    public let body: String
    public let title: String
    public let labels: [GitHubLabel]
    public let createdAt: Date
    public let updatedAt: Date
}

public struct GitHubLabel: Codable {
    public let color: String
    public let name: String
}
I’m also reusing IssueParser, since it has the logic for parsing ISO dates and snake_case JSON keys.
Here is the Yaml action, writing the JSON to disk and loading it to generate the preview:
- name: Write File
  uses: DamianReeves/write-file-action@v1.0
  with:
    path: issue.json
    contents: ${ { toJSON(github.event.issue) } }
    write-mode: overwrite
- name: Generate Preview
  run: |
    swift run socialpreview issue.json
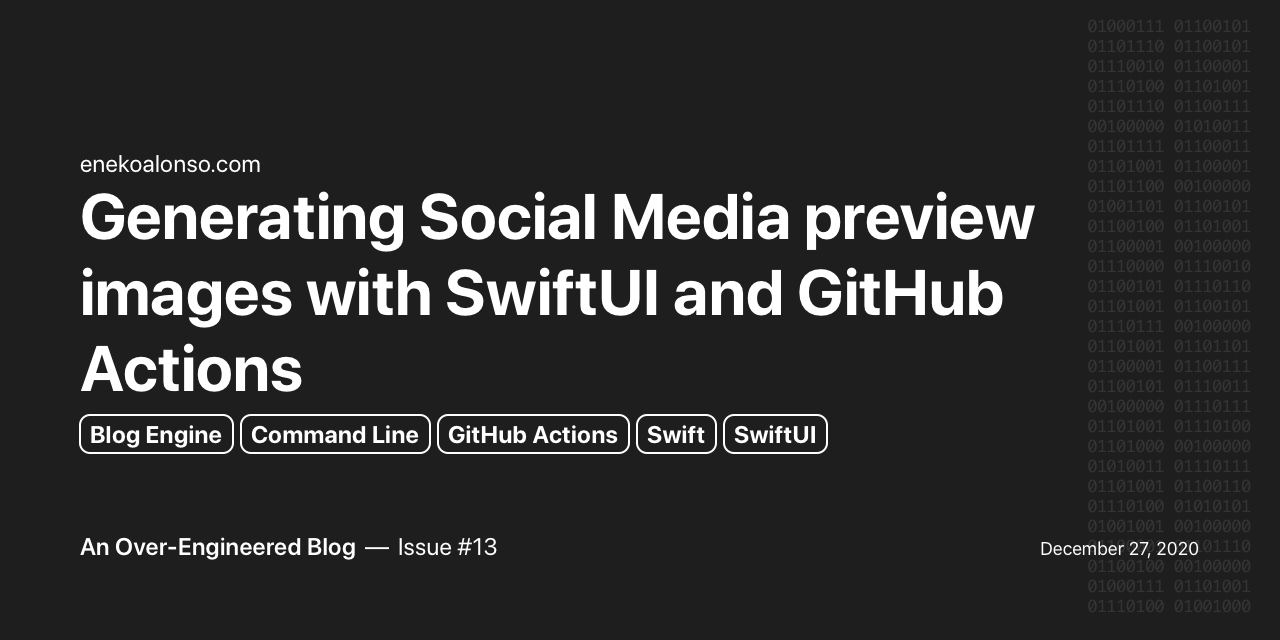
Final Result
While I’m still doing some tweaks and updates, here is the result at the moment:
Generating Social Media preview images with SwiftUI and GitHub Actionshttps://t.co/85Sf1ZOQpB#swift #SwiftUI #githubactions
— Eneko Alonso (@eneko) December 28, 2020
This article was written as an issue on my Blog repository on GitHub (see Issue #13)